Step-by-Step Guide: Installing Stainless Steel Checker Plate for Durable Flooring
Stainless steel checker plate is renowned for its durability, slip resistance, and aesthetic appeal. It is an excellent choice for various flooring applications in industrial, commercial, and even residential spaces. Whether you are installing it in a warehouse, factory, kitchen, or garage, understanding the proper installation process is essential to ensuring long-lasting performance. In this guide, we will walk you through a step-by-step process for installing stainless steel checker plate, covering everything from preparation to final touches.
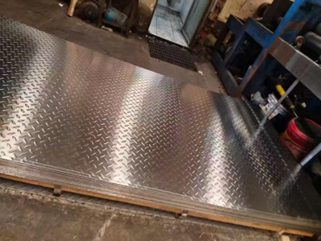
Why Choose Stainless Steel Checker Plate?
Before diving into the installation process, it’s important to understand why stainless steel checker plate is the ideal choice for durable flooring. The unique raised pattern on the surface provides excellent slip resistance, which is crucial in areas where safety is a priority. Additionally, stainless steel offers exceptional corrosion resistance, making it perfect for environments exposed to moisture, chemicals, or extreme temperatures. Its durability and ease of maintenance further enhance its appeal as a flooring material.
Key Benefits of Stainless Steel Checker Plate:
- Slip Resistance: The raised pattern reduces the risk of slips and falls, making it ideal for high-traffic areas.
- Corrosion Resistance: Stainless steel checker plate resists rust and corrosion, even in harsh environments.
- Durability: This material can withstand heavy loads, impacts, and wear over time.
- Low Maintenance: With simple cleaning and occasional inspections, stainless steel checker plate remains in top condition.
Step 1: Gather Materials and Tools
Before you begin the installation, make sure you have all the necessary materials and tools on hand. Preparation is key to ensuring a smooth and efficient process.
Materials Needed:
- Stainless Steel Checker Plate: Ensure you have the appropriate thickness and size for your project.
- Adhesive or Mechanical Fasteners: Depending on the installation method, you will need either a high-strength adhesive or stainless steel screws/bolts.
- Sealant: A suitable sealant to protect against moisture and prevent corrosion around the edges.
- Underlayment (optional): If soundproofing or insulation is needed, an underlayment may be required.
Tools Required:
- Measuring Tape: For precise measurements.
- Chalk Line: To mark the installation area.
- Metal Cutting Saw: To cut the stainless steel checker plate to size.
- Drill and Bits: For fastening the plate securely.
- Rubber Mallet: For positioning the plates without damaging the surface.
- Protective Gear: Gloves, safety glasses, and ear protection.
Step 2: Prepare the Subfloor
Proper preparation of the subfloor is critical for ensuring the stainless steel checker plate adheres correctly and performs well over time.
1. Clean the Subfloor: Remove any dirt, debris, oil, or grease from the surface. A clean subfloor ensures better adhesion and prevents imperfections from affecting the installation.
2. Level the Subfloor: Use a leveling compound to even out any irregularities in the subfloor. Stainless steel checker plate requires a flat, stable surface for optimal performance. Uneven surfaces can lead to warping or premature wear.
3. Mark the Installation Area: Using a chalk line, mark the area where the stainless steel checker plate will be installed. This will help guide the placement of the plates and ensure a straight, aligned installation.
Step 3: Measure and Cut the Checker Plate
Accurate measurements and cutting are essential to ensure a perfect fit and professional finish.
1. Measure the Area: Using your measuring tape, measure the dimensions of the area where the stainless steel checker plate will be installed. Double-check your measurements to ensure accuracy.
2. Cut the Checker Plate: If the checker plate needs to be cut to size, use a metal cutting saw with a carbide-tipped blade designed for cutting stainless steel. Make sure to wear protective gear, as cutting stainless steel can produce sparks and sharp edges.
3. File the Edges: After cutting, use a metal file to smooth out any rough edges. This helps prevent injuries and ensures a clean, finished look.
Step 4: Position and Secure the Checker Plate
Now that the plates are cut to size, it’s time to position and secure them in place.
1. Dry Fit the Plates: Before applying adhesive or drilling, lay the plates in their intended positions to ensure a proper fit. Adjust as needed to achieve tight seams and alignment.
2. Apply Adhesive (Optional): If you are using an adhesive, apply it evenly to the back of the stainless steel checker plate. Press the plate firmly onto the subfloor, making sure it adheres evenly. Use a rubber mallet to tap the plate into position without damaging the surface.
3. Mechanical Fastening: For installations where mechanical fasteners are preferred, use stainless steel screws or bolts to secure the checker plate to the subfloor. Space the fasteners evenly along the edges and in the center of the plate to prevent shifting.
4. Seam Sealing: If multiple plates are being installed, use a sealant to fill the seams between the plates. This will prevent moisture from seeping underneath the plates and causing corrosion or damage to the subfloor.
Step 5: Finishing Touches
After securing the plates, you’ll need to add the finishing touches to ensure the installation is complete and ready for use.
1. Edge Trim: If the stainless steel checker plate installation requires edge protection, apply trim or edging around the perimeter. This not only improves the aesthetics but also prevents tripping hazards.
2. Clean the Surface: Use a stainless steel cleaner to remove any adhesive residue, fingerprints, or debris from the surface of the plates. Regular cleaning will help maintain the plate’s appearance and performance over time.
3. Inspect the Installation: Conduct a final inspection to ensure all plates are securely fastened and aligned properly. Check for any gaps or imperfections and make adjustments as necessary.
Step 6: Maintenance and Care
Once your stainless steel checker plate flooring is installed, regular maintenance will help prolong its life and keep it looking great.
1. Routine Cleaning: Clean the floor regularly with a mild detergent and water to prevent dirt and grime from accumulating. Avoid using abrasive cleaners or tools that could scratch the surface.
2. Inspect for Damage: Periodically inspect the checker plate for any signs of damage, such as scratches, dents, or corrosion. Address any issues promptly to prevent further deterioration.
3. Sealant Maintenance: Check the sealant applied to the seams periodically to ensure it remains intact. Reapply as needed to maintain a moisture-proof barrier.
Conclusion
Installing stainless steel checker plate for flooring is a practical and durable solution for a wide range of environments. By following the step-by-step guide above, you can ensure a successful installation that provides long-lasting performance, safety, and aesthetic appeal. Whether in an industrial, commercial, or residential setting, stainless steel checker plate flooring is a reliable choice that stands up to the toughest conditions while offering low maintenance and superior durability. For quality materials, it’s essential to choose reputable stainless steel sheet suppliers who can provide the right products for your project needs, ensuring both performance and longevity.